쿠버네티스 데이터베이스 오퍼레이터 스터디 2주차 도전과제로 MySQL Operator 설치 후 Sysbench로 벤치마크하는 과제를 진행했다. 여기서 벤치마크는, Kubestr 실습과 비슷하게, 하드웨어 또는 쿠버네티스 클러스터 구성이나 오퍼레이터와 같은 실제 인프라에 대한 벤치마크가 아닌 벤치마크 연습 정도이다.
MySQL 서버 인스턴스를 최소 구성인 세대가 노드 하나씩에 분산하기 위해 워커 노드 하나를 추가했다. 먼저 MySQL Operator를 헬름 차트로 설치해, 문서의 설명과 설치된 자원을 확인해본다. 그리고 sysbench를 실행해 결과를 확인한다.
MySQL Operator
다음 명령으로 MySQL Operator 헬름 차트를 설치한다:
$ helm repo add mysql-operator https://mysql.github.io/mysql-operator/
$ helm repo update
$ helm install mysql-operator mysql-operator/mysql-operator \
  --namespace mysql-operator --create-namespace --version 2.0.4
차트 이름과 같은 오퍼레이터 디플로이먼트와 서비스가 생긴다. Values도 딱히 없고, 디플로이먼트(오퍼레이터) 레플리카는 1이다. 서비스는 이따 mysqlsh 접속할 때 사용한다:
$  k get all -n mysql-operator
NAME                                  READY   STATUS    RESTARTS        AGE
pod/mysql-operator-659ff68ccf-rqnvv   1/1     Running   1 (3h17m ago)   3h17m

NAME                     TYPE        CLUSTER-IP     EXTERNAL-IP   PORT(S)    AGE
service/mysql-operator   ClusterIP   10.109.71.40   <none>        9443/TCP   5h55m

NAME                             READY   UP-TO-DATE   AVAILABLE   AGE
deployment.apps/mysql-operator   1/1     1            1           5h55m

NAME                                        DESIRED   CURRENT   READY   AGE
replicaset.apps/mysql-operator-659ff68ccf   1         1         1       5h55m
MySQL InnoDB Cluster
다음 명령으로 MySQL InnoDB Cluster 헬름 차트를 설치한다. 위 오퍼레이터와 같은 레포이고, 현재 오퍼레이터는 InnoDB 클러스터만 지원한다. 필수로 지정해야하는 root 비밀번호와 실습에서 간단히 TLS를 비활성화(self-signed) 하기 위한 values를 넘겨준다:
$ helm install mycluster mysql-operator/mysql-innodbcluster \
  --set credentials.root.password='sakila' \
  --set tls.useSelfSigned=true \
  --namespace mysql-cluster --create-namespace --version 2.0.4
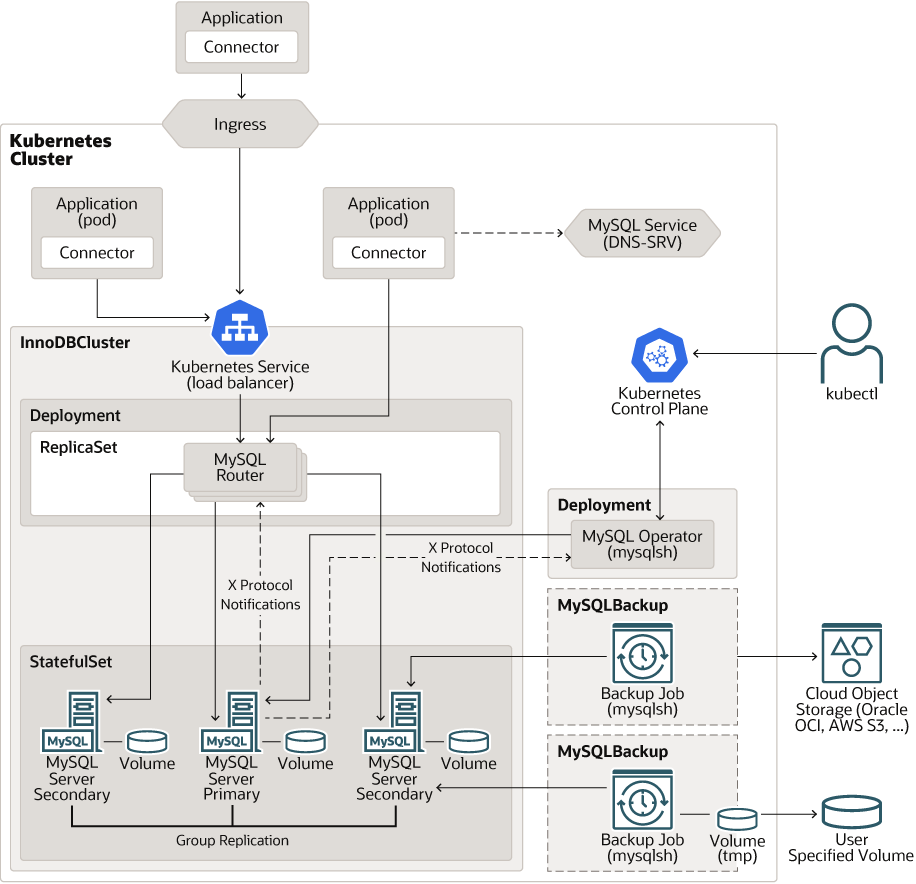
잘 설치 됐는지 문서를 보며 확인한다. 구조 그림에서 InnoDB Cluster 부분만 있을 것이다(Deployment(오퍼레이터)는 앞서 확인했다:
$ k get sts -n mysql-cluster -owide
NAME        READY   AGE    CONTAINERS      IMAGES
mycluster   3/3     9m4s   sidecar,mysql   mysql/mysql-operator:8.0.29-2.0.4,mysql/mysql-server:8.0.29

$ k get pod -n mysql-cluster -l component=mysqld -owide
NAME          READY   STATUS    RESTARTS   AGE
mycluster-0   2/2     Running   0          8m58s
mycluster-1   2/2     Running   0          8m58s
mycluster-2   2/2     Running   0          8m58s
- 그림처럼 기본으로 서버 인스턴스 3대(1 Primary + 2 Secondary)가 스테이트풀셋으로 설치된다.
- 각 파드는 mysqld와 사이드카 두 개의 컨테이너가 있다.
# MySQL Instances
$ k get deploy -n mysql-cluster
NAME               READY   UP-TO-DATE   AVAILABLE   AGE
mycluster-router   1/1     1            1           10m

$ k get pod -n mysql-cluster -l component=mysqlrouter
NAME                                READY   STATUS    RESTARTS   AGE
mycluster-router-5f9758dc8f-t8mw6   1/1     Running   0          8m47s
라우터는 디플로이먼트 레플리카 1개로 생성됐다.
# MySQL Router
$ k get svc -n mysql-cluster
NAME                  TYPE        CLUSTER-IP      EXTERNAL-IP   PORT(S)                                                  AGE
mycluster             ClusterIP   10.99.191.158   <none>        3306/TCP,33060/TCP,6446/TCP,6448/TCP,6447/TCP,6449/TCP   11m
mycluster-instances   ClusterIP   None            <none>        3306/TCP,33060/TCP,33061/TCP                             11m
라우터의 서비스 myscluster(= 클러스터 이름 = 차트 이름)와 스테이트풀셋 파드 각각 식별, 접근할 수 있는 헤드리스 서비스가 노출되어 있다.
# Configmap & Secrets
$ k get cm -n mysql-cluster mycluster-initconf
NAME                 DATA   AGE
mycluster-initconf   8      11m

$ k get secret -n mysql-cluster | grep mycluster

mycluster-backup                  Opaque                                2      13m
mycluster-cluster-secret          Opaque                                3      13m
mycluster-privsecrets             Opaque                                2      13m
mycluster-router                  Opaque                                2      13m
mycluster-sa-token-v6dnx          kubernetes.io/service-account-token   3      13m
sh.helm.release.v1.mycluster.v1   helm.sh/release.v1                    1      13m
my.cnf에 해당하는 컨피그맵과 서비스 계정이 사용하는 시크릿이 추가됐다.
# PVC & PV
$ k get pvc -n mysql-cluster
NAME                  STATUS   VOLUME                                     CAPACITY   ACCESS MODES   STORAGECLASS   AGE
datadir-mycluster-0   Bound    pvc-89f9d61f-bde9-4bb6-8cbd-6cef17566079   2Gi        RWO            local-path     116m
datadir-mycluster-1   Bound    pvc-73019433-cc69-4285-8a60-8c5d4c72a9f1   2Gi        RWO            local-path     116m
datadir-mycluster-2   Bound    pvc-56455d92-64a7-4f99-a9c7-072f2ff77992   2Gi        RWO            local-path     116m

$ k get pv | grep mysql-cluster
pvc-56455d92-64a7-4f99-a9c7-072f2ff77992   2Gi        RWO            Delete           Bound    mysql-cluster/datadir-mycluster-2   local-path              118m
pvc-73019433-cc69-4285-8a60-8c5d4c72a9f1   2Gi        RWO            Delete           Bound    mysql-cluster/datadir-mycluster-1   local-path              118m
pvc-89f9d61f-bde9-4bb6-8cbd-6cef17566079   2Gi        RWO            Delete
각 서버 인스턴스마다 PV & PVC가 생성됐다. 여기선 실습 환경의 기본 저장소 클래스인 local-path가 사용됐다.
이런 쿠버네티스 리소스 셋을 정의한 커스텀 리소스 InnoDBCluster도 생성된다:
# InnoDBCluster
k get innodbclusters.mysql.oracle.com -n mysql-cluster
NAME        STATUS           ONLINE   INSTANCES   ROUTERS   AGE
mycluster   ONLINE           3        3           1         4h40m
추가로 오퍼레이터 설치 시 생긴 CRD가 궁금해 살펴보다가, MySQL Operator는 kopf(Kubernetes Operator Pythonic Framework)라는 파이썬 프레임워크로 만들었단 사실을 알게 됐다:
# MySQL Operator 설치 시 추가된 CRD
k get crd | grep -E '(mysql[.]oracle[.]com|zalando[.]org)'
clusterkopfpeerings.zalando.org                       2022-06-08T00:15:48Z
innodbclusters.mysql.oracle.com                       2022-06-08T00:15:48Z
kopfpeerings.zalando.org                              2022-06-08T00:15:48Z
mysqlbackups.mysql.oracle.com                         2022-06-08T00:15:48Z
Sysbench
Sysbench는 이름 그대로 시스템 메트릭을 벤치마크할 수 있는 도구인데, 대상이 MySQL을 포함한 몇몇 데이터베이스도 벤치마크 할 수 있게 확장되었다. 또 Lua 스크립트로 벤치마크 시나리오를 만들 수 있다. 기본으로 제공되는 OTLP 벤치마크 스크립트를 사용해볼 것이다.
Sysbench는 제공되는 컨테이너 이미지가 딱 원하는 것이 없어서 맨 처음엔 노드에 설치하여 벤치마크 했으나, 기본 ClusterIP인 InnoDB Cluster 라우터의 서비스를 NodePort로 변경해야 하는 등 번거로움이 있었다. 그래서 하나 만들었다(이미지, 코드). 인자 없이 기본으로 실행하면 sysbench help 메시지를 볼 수 있다:
$ k run sysbench --image=vonogoru123/sysbench -it --restart=Never
Usage:
  sysbench [options]... [testname] [command]

Commands implemented by most tests: prepare run cleanup help

General options:
  --threads=N                     number of threads to use [1]
  --events=N                      limit for total number of events [0]
  --time=N                        limit for total execution time in seconds [10]
  --forced-shutdown=STRING        number of seconds to wait after the --time limit before forcing shutdown, or 'off' to disable
 [off]
  --thread-stack-size=SIZE        size of stack per thread [64K]
  --rate=N                        average transactions rate. 0 for unlimited rate [0]
  --report-interval=N             periodically report intermediate statistics with a specified interval in seconds. 0 disables
intermediate reports [0]
  --report-checkpoints=[LIST,...] dump full statistics and reset all counters at specified points in time. The argument is a li
st of comma-separated values representing the amount of time in seconds elapsed from start of test when report checkpoint(s) mu
st be performed. Report checkpoints are off by default. []
  --debug[=on|off]                print more debugging info [off]
  --validate[=on|off]             perform validation checks where possible [off]
  --help[=on|off]                 print help and exit [off]
  --version[=on|off]              print version and exit [off]
  --config-file=FILENAME          File containing command line options
  --tx-rate=N                     deprecated alias for --rate [0]
  --max-requests=N                deprecated alias for --events [0]
  --max-time=N                    deprecated alias for --time [0]
  --num-threads=N                 deprecated alias for --threads [1]

Pseudo-Random Numbers Generator options:
  --rand-type=STRING random numbers distribution {uniform,gaussian,special,pareto} [special]
  --rand-spec-iter=N number of iterations used for numbers generation [12]
  --rand-spec-pct=N  percentage of values to be treated as 'special' (for special distribution) [1]
  --rand-spec-res=N  percentage of 'special' values to use (for special distribution) [75]
  --rand-seed=N      seed for random number generator. When 0, the current time is used as a RNG seed. [0]             [1/1991]
  --rand-pareto-h=N  parameter h for pareto distribution [0.2]

Log options:
  --verbosity=N verbosity level {5 - debug, 0 - only critical messages} [3]

  --percentile=N       percentile to calculate in latency statistics (1-100). Use the special value of 0 to disable percentile
calculations [95]
  --histogram[=on|off] print latency histogram in report [off]

General database options:

  --db-driver=STRING  specifies database driver to use ('help' to get list of available drivers) [mysql]
  --db-ps-mode=STRING prepared statements usage mode {auto, disable} [auto]
  --db-debug[=on|off] print database-specific debug information [off]


Compiled-in database drivers:
  mysql - MySQL driver

mysql options:
  --mysql-host=[LIST,...]          MySQL server host [localhost]
  --mysql-port=[LIST,...]          MySQL server port [3306]
  --mysql-socket=[LIST,...]        MySQL socket
  --mysql-user=STRING              MySQL user [sbtest]
  --mysql-password=STRING          MySQL password []
  --mysql-db=STRING                MySQL database name [sbtest]
  --mysql-ssl[=on|off]             use SSL connections, if available in the client library [off]
  --mysql-ssl-cipher=STRING        use specific cipher for SSL connections []
  --mysql-compression[=on|off]     use compression, if available in the client library [off]
  --mysql-debug[=on|off]           trace all client library calls [off]
  --mysql-ignore-errors=[LIST,...] list of errors to ignore, or "all" [1213,1020,1205]
  --mysql-dry-run[=on|off]         Dry run, pretend that all MySQL client API calls are successful without executing them [off]

Compiled-in tests:
  fileio - File I/O test
  cpu - CPU performance test
  memory - Memory functions speed test
  threads - Threads subsystem performance test
  mutex - Mutex performance test

See 'sysbench <testname> help' for a list of options for each test.
엄청 길지만 사용할 옵션과 명령은 한정적이다. 먼저 sysbench는 prepare -> run -> cleanup 순서의 서브 명령으로 실행된다.
테스트 이름은 내장된 lua 스크립트를 사용할 것이고, 내장된 스크립트의 상위 디렉토리 경로는 내가 만든 이미지처럼 컴파일 버전에선 /usr/local/share/sysbench/ 이다.
MySQL 벤치마크만 할 것이므로 --db-driver=mysql 옵션과 MySQL 접속 정보 --mysql-* 옵션은 고정이다.
나머지 중에 사용할 옵션은 벤치마크 시 이벤트 쿼리하는 스레드 개수(--threads=N)와 벤치마크 시간 초(--time=N).
테스트 특정해서 사용할 옵션은 테이블 개수(--tables=N), 테이블 당 레코드 수(--table-size=N) 그리고 리포트 주기(--report-interval=N)이다. 테스트 할 oltp_read_only에 대해 help를 보면 옵션을 알 수 있다:
$ k run sysbench --image=vonogoru123/sysbench -it --restart=Never -- /usr/local/share/sysbench/oltp_read_only.lua help
sysbench 1.0.20 (using bundled LuaJIT 2.1.0-beta2)

oltp_read_only.lua options:
  --auto_inc[=on|off]           Use AUTO_INCREMENT column as Primary Key (for MySQL), or its alternatives in other DBMS. When disabled, use client-generated IDs [on]
  --create_secondary[=on|off]   Create a secondary index in addition to the PRIMARY KEY [on]
  --delete_inserts=N            Number of DELETE/INSERT combinations per transaction [1]
  --distinct_ranges=N           Number of SELECT DISTINCT queries per transaction [1]
  --index_updates=N             Number of UPDATE index queries per transaction [1]
  --mysql_storage_engine=STRING Storage engine, if MySQL is used [innodb]
  --non_index_updates=N         Number of UPDATE non-index queries per transaction [1]
  --order_ranges=N              Number of SELECT ORDER BY queries per transaction [1]
  --pgsql_variant=STRING        Use this PostgreSQL variant when running with the PostgreSQL driver. The only currently supported variant is 'redshift'. When enabled, create_secondary is automatically disabled, and delete_inserts is set to 0
  --point_selects=N             Number of point SELECT queries per transaction [10]
  --range_selects[=on|off]      Enable/disable all range SELECT queries [on]
  --range_size=N                Range size for range SELECT queries [100]
  --secondary[=on|off]          Use a secondary index in place of the PRIMARY KEY [off]
  --simple_ranges=N             Number of simple range SELECT queries per transaction [1]
  --skip_trx[=on|off]           Don't start explicit transactions and execute all queries in the AUTOCOMMIT mode [off]
  --sum_ranges=N                Number of SELECT SUM() queries per transaction [1]
  --table_size=N                Number of rows per table [10000]
  --tables=N                    Number of tables [1]
예를 들어, 서브 명령 run을 실행한다면 옵션은 다음과 같다:
$ sysbench --db-driver=mysql \
  --mysql-host=mycluster.mysql-cluster --mysql-port=3306
  --mysql-user=sysbench --mysql-password=sysbench --mysql-db=sysbench \
  --report-interval=1 --table-size=100000 --threads=4 --tables=2 \
  /usr/local/share/sysbench/oltp_read_only.lua run
접속 호스트는 앞서 언급한 InnoDBCluster의 라우터 서비스로 한다.
레코드 1M개의 테이블은 인덱스를 포함해 약 200MB 정도이다. 그리고 테이블은 2개로 했는데, 레코드나 테이블 이 이상 크기로 벤치마크하면 소박한 나의 로컬 환경(kubeadm의 최소 사양이다)에선 오퍼레이터나 클러스터의 MySQL 인스턴스가 잘 작동하지 않고, 벤치마크 테이블 생성 또는 벤치마크 중 오류가 났다.
접속 정보 옵션에 해당하는 계정(+권한), 데이터베이스를 직접 만들어 준다. mysqlsh 접속을 위해 위에서 언급한 오퍼레이터 파드를 사용한다:
$ k exec -it -n mysql-operator deploy/mysql-operator -- \
  mysqlsh mysqlx://root@mycluster.mysql-cluster --password=sakila --sqlx \
  -e "CREATE DATABASE IF NOT EXISTS sysbench;
      CREATE USER IF NOT EXISTS 'sysbench'@'%' IDENTIFIED WITH 'mysql_native_password' BY 'sysbench';
      GRANT ALL ON sysbench.* to 'sysbench'@'%';
      FLUSH PRIVILEGES;
preprae -> run -> cleanup 세 개의 파드가 순서대로 실행하기 위해 initContainers를 활용한 파드 Job을 만들었다. 비교적 적은 개수의 컨테이너가 순서대로만 실행되면 되기에 워크플로우 리소스는 사용하지 않았다:
apiVersion: batch/v1
kind: Job
metadata:
  creationTimestamp: null
  name: sysbench-oltp-read-only
spec:
  template:
    metadata:
      creationTimestamp: null
    spec:
      initContainers:
      - args:
        - --db-driver=mysql
        - --mysql-host=mycluster.mysql-cluster
        - --mysql-port=3306
        - --mysql-user=sysbench
        - --mysql-password=sysbench
        - --mysql-db=sysbench
        - --table-size=1000000
        - --threads=4
        - --tables=2
        - /usr/local/share/sysbench/oltp_read_only.lua
        - prepare
        image: vonogoru123/sysbench
        name: sysbench-prepare
      - args:
        - --db-driver=mysql
        - --mysql-host=mycluster.mysql-cluster
        - --mysql-port=3306
        - --mysql-user=sysbench
        - --mysql-password=sysbench
        - --mysql-db=sysbench
        - --report-interval=10
        - --table-size=1000000
        - --threads=4
        - --tables=2
        - --time=180
        - /usr/local/share/sysbench/oltp_read_only.lua
        - run
        image: vonogoru123/sysbench
        name: sysbench-run
      containers:
      - args:
        - --db-driver=mysql
        - --mysql-host=mycluster.mysql-cluster
        - --mysql-port=3306
        - --mysql-user=sysbench
        - --mysql-password=sysbench
        - --mysql-db=sysbench
        - --table-size=1000000
        - --threads=4
        - --tables=2
        - /usr/local/share/sysbench/oltp_read_only.lua
        - cleanup
        image: vonogoru123/sysbench
        name: sysbench-cleanup
      nodeSelector:
        kubernetes.io/hostname: cluster1-master1
      tolerations:
      - key: node-role.kubernetes.io/master
        operator: Exists
        effect: NoSchedule
      restartPolicy: Never
status: {}
Job을 실행하고 각 컨테이너 로그를 확인하자. 먼저 prepare에선 옵션으로 준 크기의, 벤치마크할 테이블을 만든다:
$ k apply -f sysbench-oltp-read-only.yaml

$ k logs -f job/sysbench-oltp-read-only sysbench-prepare
sysbench 1.0.20 (using bundled LuaJIT 2.1.0-beta2)

Initializing worker threads...

Creating table 'sbtest1'...
Creating table 'sbtest2'...
Inserting 1000000 records into 'sbtest2'
Inserting 1000000 records into 'sbtest1'
Creating a secondary index on 'sbtest1'...
Creating a secondary index on 'sbtest2'...
mysqlsh에서 테이블 크기를 확인해본다:
SELECT table_name, round((data_length + index_length) / 1024 / 1024, 2) `MB` FROM information_schema.TABLES WHERE table_schema = 'sysbench';
+------------+--------+
| TABLE_NAME | MB     |
+------------+--------+
| sbtest1    | 208.70 |
| sbtest2    | 207.70 |
+------------+--------+
2 rows in set (0.0365 sec)
run 컨테이너 로그를 확인해 벤치마크 보고서를 본다:
$ k logs -f job/sysbench-oltp-read-only sysbench-run
sysbench 1.0.20 (using bundled LuaJIT 2.1.0-beta2)

Running the test with following options:
Number of threads: 4
Report intermediate results every 10 second(s)
Initializing random number generator from current time


Initializing worker threads...

Threads started!

[ 10s ] thds: 4 tps: 186.45 qps: 2984.98 (r/w/o: 2611.77/0.00/373.21) lat (ms,95%): 33.12 err/s: 0.00 reconn/s: 0.00
[ 20s ] thds: 4 tps: 179.01 qps: 2866.71 (r/w/o: 2508.58/0.00/358.13) lat (ms,95%): 33.72 err/s: 0.00 reconn/s: 0.00
[ 30s ] thds: 4 tps: 172.99 qps: 2766.28 (r/w/o: 2420.31/0.00/345.97) lat (ms,95%): 36.24 err/s: 0.00 reconn/s: 0.00
[ 40s ] thds: 4 tps: 173.90 qps: 2783.98 (r/w/o: 2436.19/0.00/347.80) lat (ms,95%): 34.33 err/s: 0.00 reconn/s: 0.00
[ 50s ] thds: 4 tps: 174.71 qps: 2795.41 (r/w/o: 2445.99/0.00/349.41) lat (ms,95%): 33.72 err/s: 0.00 reconn/s: 0.00
[ 60s ] thds: 4 tps: 160.09 qps: 2560.14 (r/w/o: 2239.96/0.00/320.18) lat (ms,95%): 40.37 err/s: 0.00 reconn/s: 0.00
[ 70s ] thds: 4 tps: 172.01 qps: 2751.38 (r/w/o: 2407.36/0.00/344.02) lat (ms,95%): 34.95 err/s: 0.00 reconn/s: 0.00
[ 80s ] thds: 4 tps: 173.00 qps: 2769.54 (r/w/o: 2423.53/0.00/346.00) lat (ms,95%): 34.33 err/s: 0.00 reconn/s: 0.00
[ 90s ] thds: 4 tps: 172.20 qps: 2753.82 (r/w/o: 2409.42/0.00/344.40) lat (ms,95%): 33.72 err/s: 0.00 reconn/s: 0.00
[ 100s ] thds: 4 tps: 171.59 qps: 2747.06 (r/w/o: 2403.88/0.00/343.18) lat (ms,95%): 34.33 err/s: 0.00 reconn/s: 0.00
[ 110s ] thds: 4 tps: 168.50 qps: 2694.94 (r/w/o: 2357.94/0.00/337.01) lat (ms,95%): 36.89 err/s: 0.00 reconn/s: 0.00
[ 120s ] thds: 4 tps: 173.31 qps: 2773.24 (r/w/o: 2426.62/0.00/346.62) lat (ms,95%): 34.95 err/s: 0.00 reconn/s: 0.00
[ 130s ] thds: 4 tps: 171.19 qps: 2739.61 (r/w/o: 2397.22/0.00/342.39) lat (ms,95%): 34.33 err/s: 0.00 reconn/s: 0.00
[ 140s ] thds: 4 tps: 165.00 qps: 2640.04 (r/w/o: 2310.04/0.00/330.01) lat (ms,95%): 36.89 err/s: 0.00 reconn/s: 0.00
[ 150s ] thds: 4 tps: 166.99 qps: 2672.52 (r/w/o: 2338.44/0.00/334.08) lat (ms,95%): 34.95 err/s: 0.00 reconn/s: 0.00
[ 160s ] thds: 4 tps: 148.11 qps: 2367.50 (r/w/o: 2071.39/0.00/296.11) lat (ms,95%): 44.17 err/s: 0.00 reconn/s: 0.00
[ 170s ] thds: 4 tps: 159.00 qps: 2543.83 (r/w/o: 2225.93/0.00/317.90) lat (ms,95%): 38.25 err/s: 0.00 reconn/s: 0.00
[ 180s ] thds: 4 tps: 168.50 qps: 2696.55 (r/w/o: 2359.44/0.00/337.11) lat (ms,95%): 35.59 err/s: 0.00 reconn/s: 0.00
SQL statistics:
    queries performed:
        read:                            427980
        write:                           0
        other:                           61140
        total:                           489120
    transactions:                        30570  (169.81 per sec.)
    queries:                             489120 (2716.95 per sec.)
    ignored errors:                      0      (0.00 per sec.)
    reconnects:                          0      (0.00 per sec.)

General statistics:
    total time:                          180.0236s
    total number of events:              30570

Latency (ms):
         min:                                    9.64
         avg:                                   23.55
         max:                                  189.01
         95th percentile:                       35.59
         sum:                               719855.01

Threads fairness:
    events (avg/stddev):           7642.5000/293.55
    execution time (avg/stddev):   179.9638/0.00
TPS, QPS나 응답 속도(latency) 관련한 통계치를 볼 수 있다.
cleanup 로그를 보면 벤치마크에 사용한 테이블을 삭제한다:
$ k logs -f job/sysbench-oltp-read-only sysbench-cleanup
sysbench 1.0.20 (using bundled LuaJIT 2.1.0-beta2)

Dropping table 'sbtest1'...
Dropping table 'sbtest2'...
MySQL Operator 는 GA 버전이 출시된지 얼마 안됐다. 그래서인지 벤치마크 데이터를 만들다가도 오퍼레이터나 InnoDB Cluster 일부가 장애가 나고 회복 안되거나 쿠버네티스 API 응답과 불일치하는 경우도 있었다. 하지만 확실치 않은 것은, 앞서 말한듯, 실습한 환경의 노드가 최소 사양이기 때문에 쿠버네티스 클러스터 노드의 장애가 원인인지도 모르겠다.
먼저 노드 메트릭 수집과 모니터 방안을 마련하고, MySQL Operator 모니터 툴도 설치하여 문제를 파악해봐야겠다.
정리
- MySQL Operator/InnoDB Cluster 설치, 구조를 이해했다.
- Sysbench로 MySQL Operator로 설치한 InnoDB Cluster에서 벤치마크 해보았다.
참고
- https://blogs.oracle.com/mysql/post/mysql-operator-for-kubernetes-reaches-general-availability
- https://dev.mysql.com/doc/mysql-operator/en/
- https://hoing.io/archives/1867
- https://github.com/akopytov/sysbench
- https://kopf.readthedocs.io/en/stable/
- https://kubernetes.io/docs/home/
- https://stackoverflow.com/questions/40713573/how-to-run-containers-sequentially-as-a-kubernetes-job
- https://tableplus.com/blog/2018/04/mysql-get-size-of-tables.html